
Documentation
Tutor booking
With the Tutor booking addon in Academy LMS, your students can choose instructors for different classes. Your students can book your instructors for classes. Instructors can conduct their classes according to their regularly scheduled class timetable. Your students have to pay for booking their instructors. As an admin, you can earn the commission if your students pay for booking instructors through your application.
To add this addon to your site, you have to install the addon. For this, you have to follow the steps below:
- Before installing the process, we highly recommend you check your application version. For this, you have to navigate to the "About" section from the "Settings" button.

- If you are running the mentioned version, then you are ready to install this addon.
- Download the addon you want to install on your application from Codecanyon.
- Unzip the downloaded file.
- You will get two folders inside the file. One for documentation and the other for the addon folder.
- Do not try to remove or rename any folder.
- Go back to the application and log in as an admin.
- Select the "Addon" option from the left menu.
- Click on the "Install addon."

- Provide the purchase code.
- Upload the zip file from your device.
- Click on the "Install addon" button.
- You will get a success message notification.
To get the advantage of this addon, you have to add some subject categories as an admin. You can also add sub-categories, and update or delete information whenever you want.
Admin and Instructor Panel:
Adding subject category:
To add the subject category for tutor booking, you can follow the steps below:
- Log in to the application as an admin.
- Select the "Tutor booking" option from the left menu.
- Click on the "Subject category" option from the sub-menu.
- Tap on the "Add new category" button to add a new category.

- Provide the category title
- Select the parent category. (If you want to create a parent category, click on the "None" option. If you want to create a sub-category, click on the parent category from the list)

- Click on the "Submit" button.

Editing Parent category:
To edit the parent category, you can follow the steps below:
- Log in to the application as an admin.
- Select the "Tutor booking" option from the left menu.
- Click on the "Subject category" option from the sub-menu.
- Choose a category from the list.
- Hover your mouse on the chosen category.
- Click on the "Edit" button.

- Update required information.
- Click on the "Confirm" button.

Deleting Parent category:
To remove a parent category, you can follow the steps below:
- Log in to the application as an admin.
- Select the "Tutor booking" option from the left menu.
- Click on the "Subject category" option from the sub-menu.
- Choose a category from the list.
- Hover your mouse on the chosen category.
- Select the "Delete" button.

- Click on the "Continue" button for confirmation.
Note: Only the site admin can manage the Category and sub-category.
Editing sub-category:
To edit the sub-category, you can follow the steps below:
- Log in to the application as an admin.
- Select the "Tutor booking" option from the left menu.
- Click on the "Subject category" option from the sub-menu.
- Choose a category from the list.
- Hover the mouse on the sub-category from the chosen category.
- Click on the "Edit" button.

- Update required information.
- Click on the "Confirm" button.

Deleting sub-category:
To delete the sub-category, you can follow the steps below:
- Log in to the application as an admin.
- Select the "Tutor booking" option from the left menu.
- Click on the "Subject category" option from the sub-menu.
- Choose a category from the list.
- Hover the mouse on the sub-category from the chosen category.
- Click on the "Delete" button.

- Click on the "Confirm" button.
Note: Only the site admin can manage the Category and sub-category.
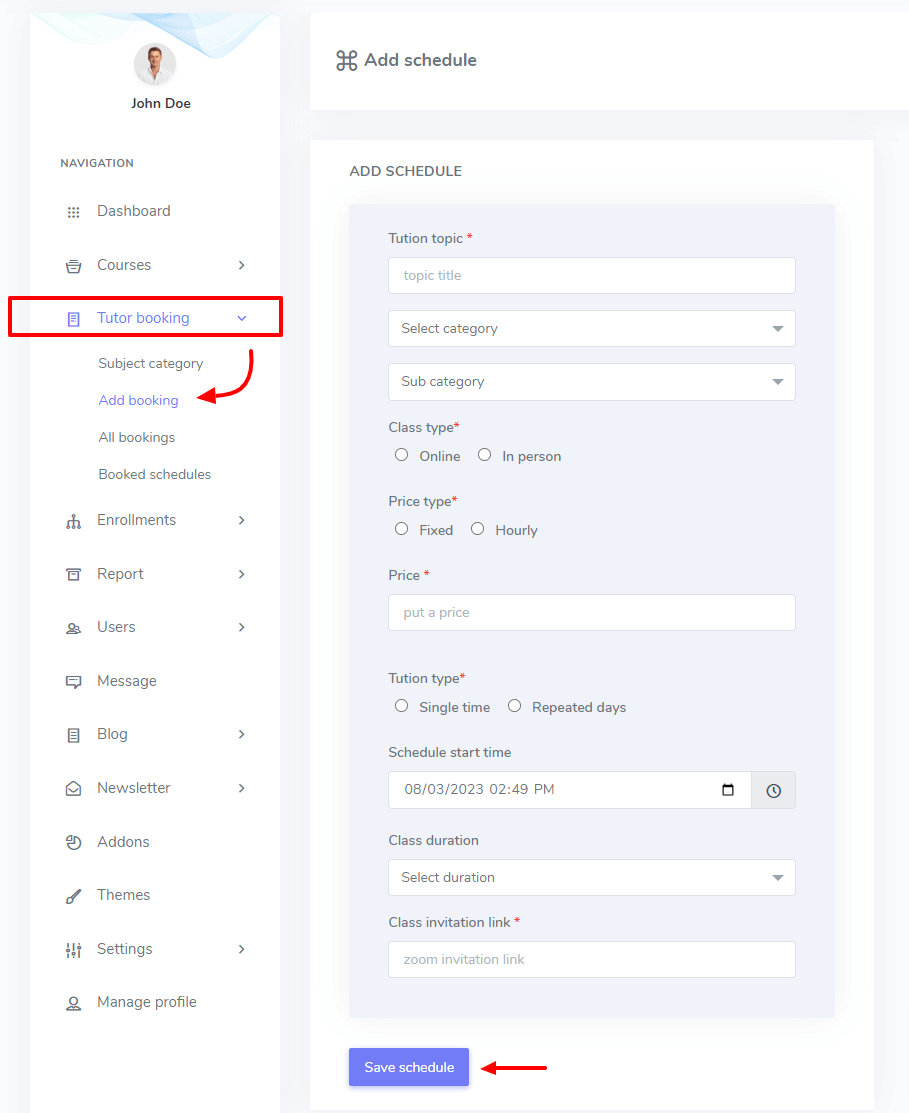
Adding booking:
Your instructors or site admin can add the schedule with this addon. Your students can book based on the instructor's published schedule. Your instructors or site admin add multiple class schedules in the application. To add the schedule, your instructors or site admin can follow the steps below:
- Log in to the application.
- Select the "Tutor booking" option from the left menu.
- Click on the "Add booking" option from the sub-menu.
- Provide a topic.
- Select category and sub-category.
- Choose the class type. (Instructors can select online or in-person class type)
- Select the tuition fee type fixed/hourly. (If the instructor chooses the "Fixed" option, students have to pay after completing the class or session. If the instructors choose the "Hourly" option, students have to pay hourly during the class or session)
- Add the price.
- Add the tuition type. (Students can select the "Single time/Repeated day" option. If the student selects the "Repeated day" they can custom days for the schedule. Then Select the customized date)
- Set the timetable for the schedules.
- Set the class duration.
- Class invitation link.
- Click on the "Save schedule" button.
The site admin can manage all instructor's class schedules and bookings from their panel but instructors can manage their own class schedules and bookings from their panel.
Class Schedule:
To see the class schedule, the site admin and instructors can follow the steps below:
- Log in to the application.
- Select the "Tutor booking" option from the left menu.
- Click on the "All booking" option from the sub-menu.
- Select a schedule from the list.
- Click on the "Action" icon for more options.

- Select the "Schedules" option.
- You can individually update or remove the booking schedule from here.

You or your instructor can see every available class from the "Schedule" option. You and your instructors can start or change the class time or make their classes inactive.
Starting a class:
To start a class, you or your instructor can follow the steps below:
- Log in to the application.
- Select the "Tutor booking" option from the left menu.
- Click on the "All booking" option from the sub-menu.
- Select a schedule from the list.
- Click on the "Action" icon for more options.
- Select the "Schedules" option.
- Choose a schedule from the list.
- Click on the "Action" option for more options.

- Tap on the "Start Class" button.

The class will be started in a few moments.
Edit class time:
To update the booking schedules, the site admin or instructors can update their class schedule information. For this, you can follow the steps below:
- Log in to the application.
- Select the "Tutor booking" option from the left menu.
- Click on the "All booking" option from the sub-menu.
- Select a schedule from the list.
- Click on the "Action" icon for more options.
- Select the "Schedules" option.
- Choose a schedule from the list.
- Click on the "Action" option for more options.
- Select the "Edit booking" option.

- Update required information.
- Click on the "Update schedule" button.

Inactivating a class:
You or your instructors can inactivate a class if they want. If you inactive a class, the students can not see that class in the frontend. To inactivate a class, you can follow the steps below:
- Log in to the application.
- Select the "Tutor booking" option from the left menu.
- Click on the "All booking" option from the sub-menu.
- Select a schedule from the list.
- Click on the "Action" icon for more options.
- Select the "Schedules" option.
- Choose a schedule from the list.
- Click on the "Action" option for more options.
- Select the "Inactive" option.

- Click on the "Continue" button for confirmation.
Edit Schedule:
The site admin or instructors can update their booking information within a few clicks. For this, they can follow the steps below:
- Log in to the application.
- Select the "Tutor booking" option from the left menu.
- Click on the "All booking" option from the sub-menu.
- Select a schedule from the list.
- Click on the "Action" icon for more options.
- Select the "Edit schedule" option.

- Update required information.
- Click on the "Update schedule" button.

How to active schedule:
To active booking schedule, the site admin or the instructors can follow the steps below:
- Log in to the application.
- Click on the "Tutor booking" option from the left menu.
- Select the "All bookings" option from the sub-menu.
- Choose a booking from the list.
- Click on the action icon.

- Select the "Schedules" option.

- Tap on the "Inactive schedules" button from the bottom of the page.

- Choose a schedule from the list.
- Click on the action icon.

- Select the "Active" button.

- Tap on the "Continue" button for confirmation.
Edit booking:
The site admin or instructors can change the class topic or class type, and price from the "Edit booking" option. For this, you or the instructor can follow the steps below:
- Log in to the application.
- Select the "Tutor booking" option from the left menu.
- Click on the "All booking" option from the sub-menu.
- Select a schedule from the list.
- Click on the "Action" icon for more options.
- Select the "Edit booking" option.

- Update required information.
- Click on the "Edit booking" button.

Inactivating booking:
You or your instructors can inactivate the booking if they want. If you inactive the booking, the students can not see bookings in the frontend. To inactivate the booking, you can follow the steps below:
- Log in to the application.
- Select the "Tutor booking" option from the left menu.
- Click on the "All booking" option from the sub-menu.
- Select a schedule from the list.
- Click on the "Action" icon for more options.
- Select the "Inactivate booking" option.

- Click on the "Continue" button for confirmation.
How to active booking:
To activate booking, the site admin or the instructors can follow the steps below:
- Log in to the application.
- Click on the "Tutor booking" option from the left menu.
- Select the "All bookings" option from the sub-menu.
- Tap on the "Inactive booking lists" button from the bottom of the page.

- Choose a schedule from the list.
- Click on the action icon.

- Select the "Active booking" button.

- Tap on the "Continue" button for confirmation.
Booked schedule:
If your students booked your tuition service, you or your instructors can see the booked list with every detail in the "Booked schedule" option. For this, the admin or instructor can follow the steps below:
- Log in to the application.
- Select the "Tutor booking" option from the left menu.
- Click on the "Booked Schedule" option from the sub-menu.

How to get the invite link:
The course instructor has to provide the meeting invitation link in the application. For this, they can follow the steps.
- Log in to the official site of Zoom/Choose a plan.
- Go to the "Meeting" option after login.
- Select the "Personal Room" option.
- Copy the invite link.

Student Panel:
With this addon, your student can book tutors to make their learning progress more effective. Your students can book tutors based on the instructor's published schedule. They can filter their result to get the best tutor for them.
How to book a tutor:
To book a tutor on Academy LMS, your students can follow the steps below:
- Log in to the application as a student.
- Select the "Categories" option from the frontend page.
- Click on the "All tuition" option.

- Select a tutor from the list.
- Click on the "Available Schedule" option to book a tutor.

- Select a suitable date from the instructor's tuition schedule.

- Click on the date.
- Select the "Request lesson" button.

- Choose a suitable payment gateway.

- Provide the required information to book a tutor.
How to join a class:
After booking a tutor, the student can join the class at the selected time and date. To join the tuition class online, they can follow the steps below:
- Log in to the application as a student.
- Select the "My course" option from the frontend page.
- Click on the "Booked tuition" button.
- Select the "Upcoming" option to see the next booking tuitions list.
- Click on the "Join class" button on the selected time and date.

How to see the previous tuition list:
To see the previous tuition list, your students can follow the steps below:
- Log in to the application as a student.
- Select the "My course" option from the frontend page.
- Click on the "Booked tuition" button.
- Select the "Archive" option to see the previous booking tuition list

How to see the payment list:
To see all payment history of tuition booking, your students can follow the steps below:
- Log in to the application as a student.
- Select the "My course" option from the frontend page.
- Click on the "Booked tuition" button.
- Select the "Payment" option to see the previous booking tuition list.

How can we help?
Contact us and we'll get back to you as soon as possible