Online shop
Enhance the feature of virtual shopping with the Online shop addon in your Atlas. Business owners can take orders and sell their products or services to their customers directly from your application through this addon. They complete their customer's orders by home delivery and take payment from cash on delivery. This addon helps to increase the sales rate by selling products and services to the customers.
Business owners can create multiple categories for their products and services. Also, they can easily manage their products within a few clicks in Atlas.
You can only add an addon on the application as a site admin. To add this addon to your application, you have to install the Online shop addon. For this, you have to follow the steps below:
- Log in to the application as an admin.
- Before installing the process, we highly recommend you check your application version. For this, you have to navigate to the "About" section from the "Settings" button.
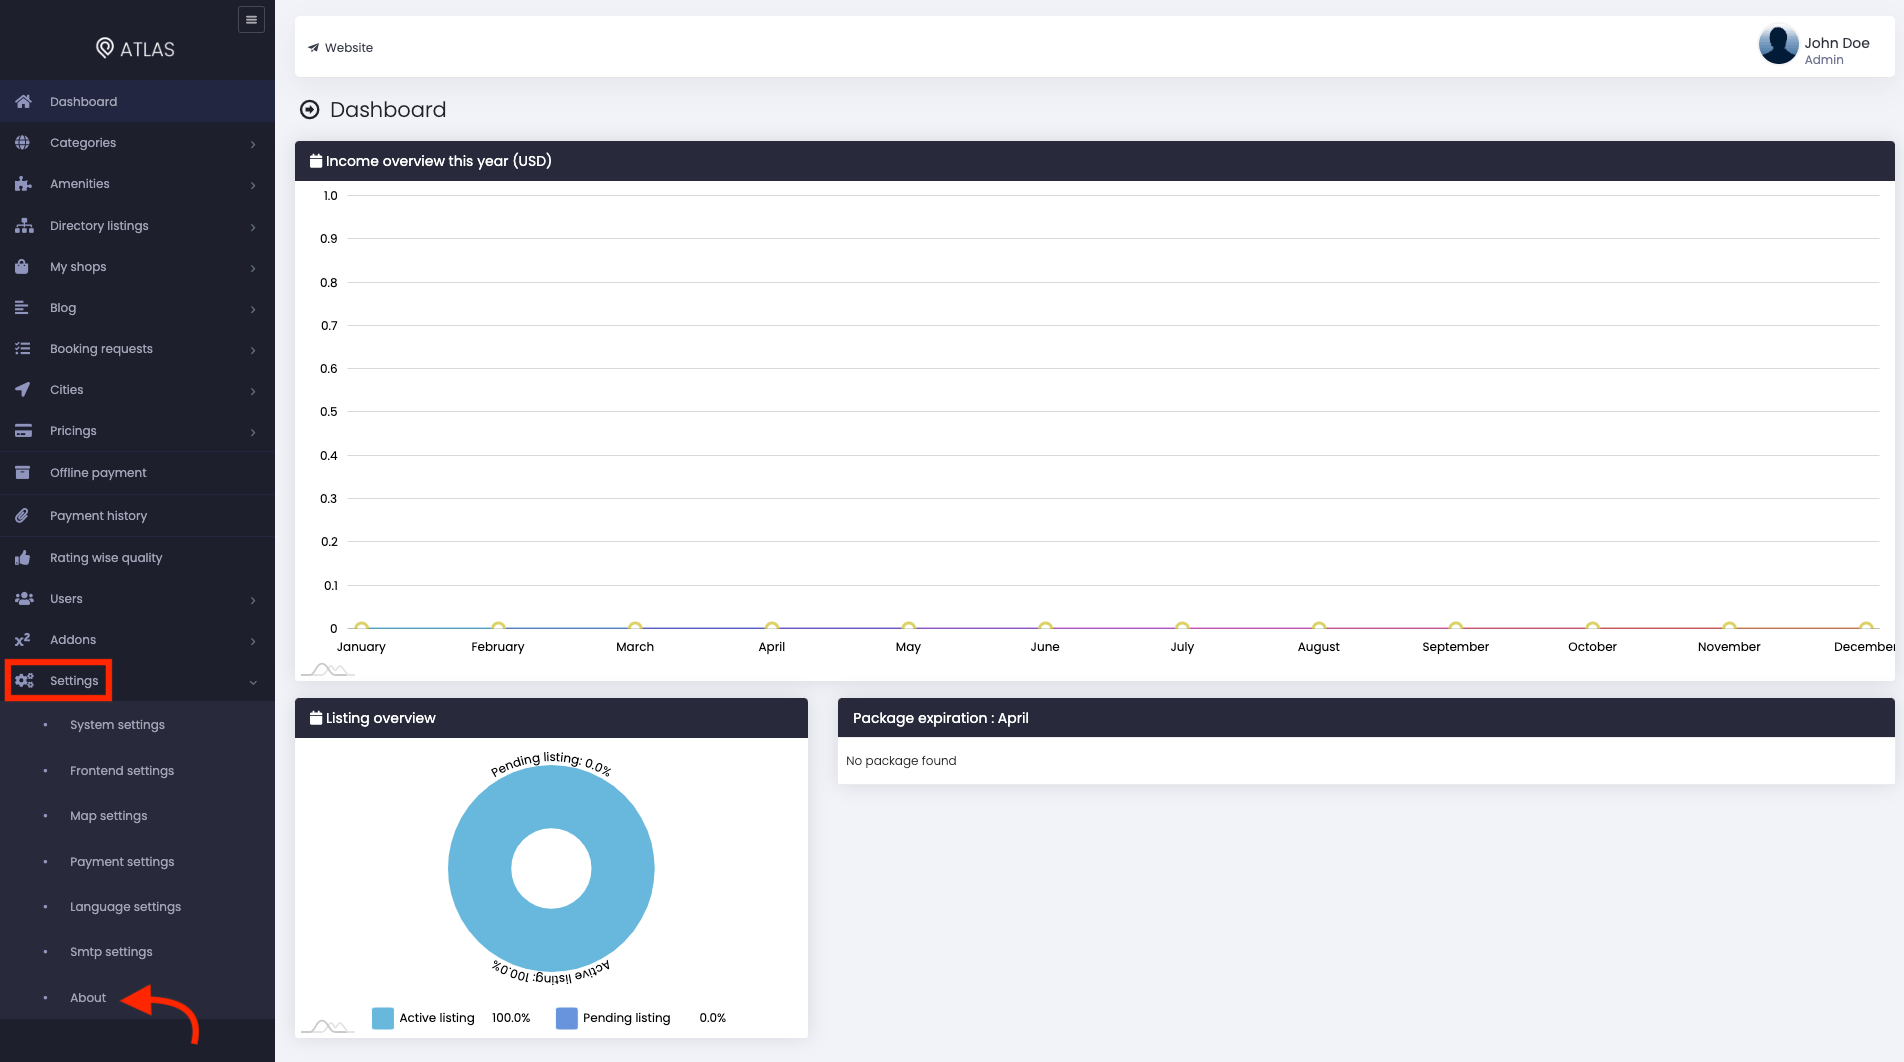
Figure 1. Atlas Checking For Application Version
- If you are running the mentioned version, then you are ready to install this addon.
- Download the addon you want to install on your application from Codecanyon.
- Unzip the downloaded file.
- You will get two folders inside the file. One for documentation and the other for the addon folder.
- Do not try to remove or rename any folder.
- Go back to the application and log in as an admin.
- Select the "Addons" option from the left menu.
- Click on the "Addon manager."
- Choose the "Add new addon" button.
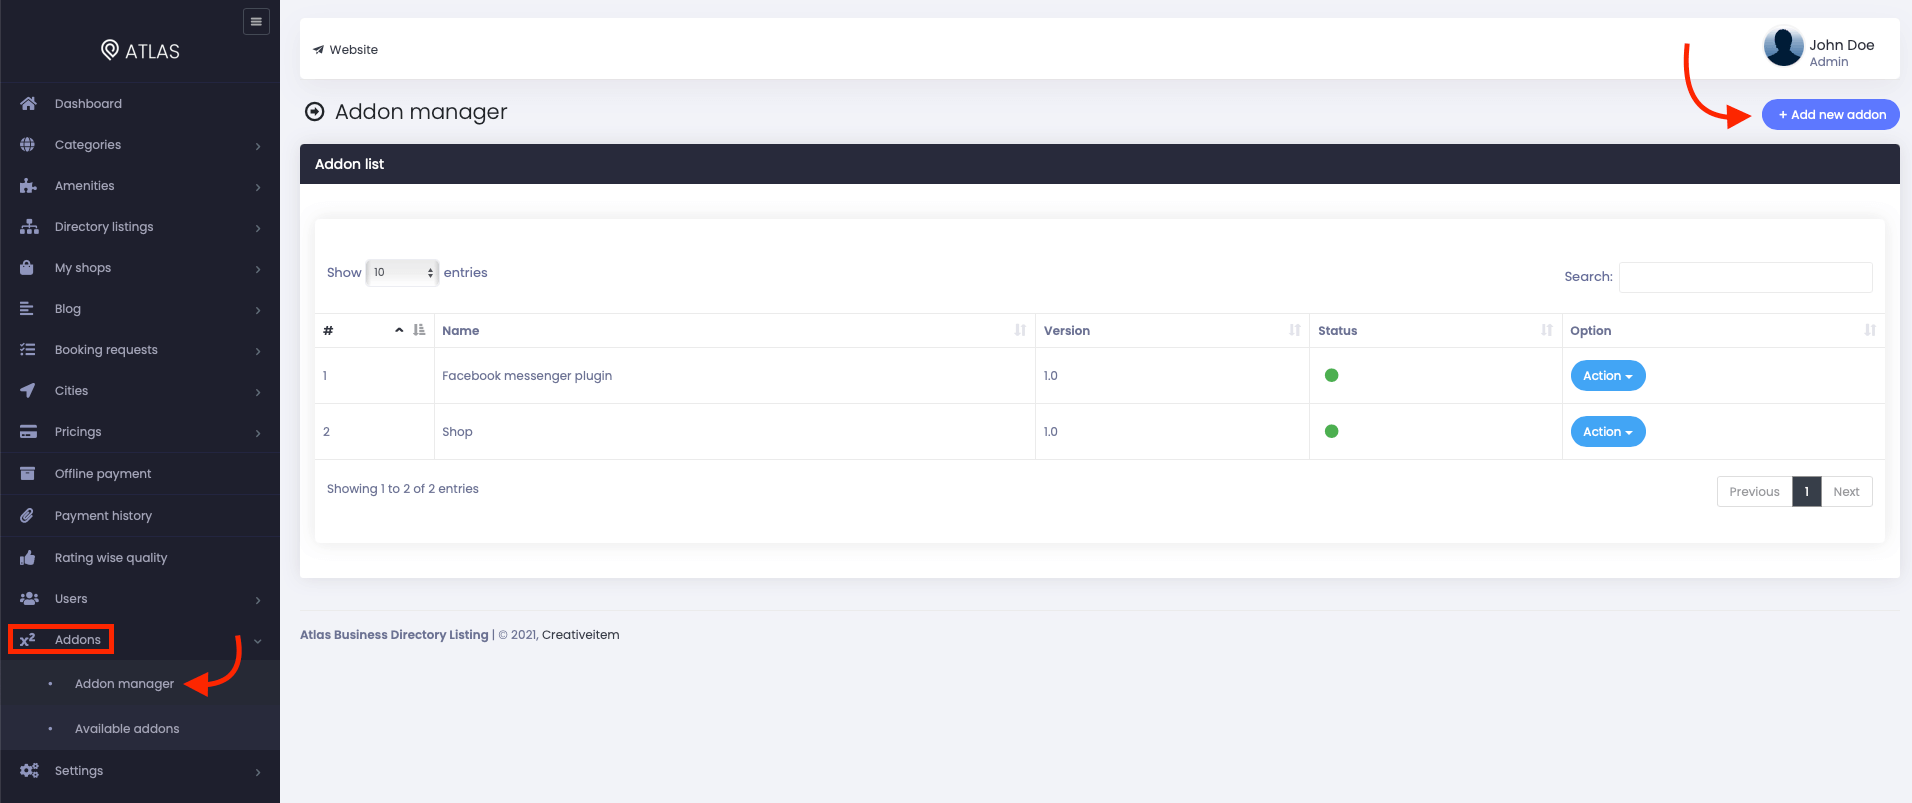
Figure 2. Atlas Adding New Addon
- Provide the purchase code.
- Upload the zip file from your device.
- Click on the "Install addon" button.
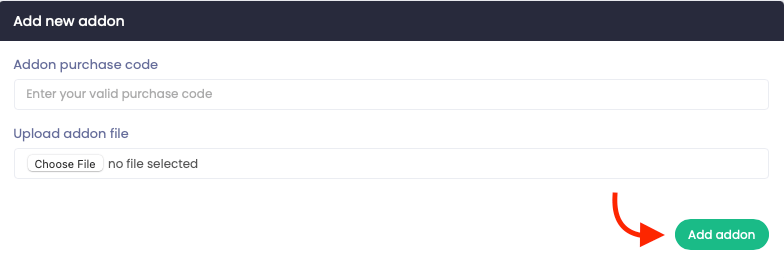
Figure 3. Atlas Uploading Addon File & Purchase Code
- You will get a success message notification.
Now, you are ready to use the Online shop addon on your application.
Admin panel
You can add, update, or remove inventory to any directories in Atlas. You can also add multiple categories to the inventory.
ReCaptcha settings:
After completing the installation process, you have to configure the ReCaptcha settings. For this, you can follow the steps below:
- Log in to the application as an admin.
- Select the "My shops" option from the left menu.
- Click on the "Recaptcha settings" option from the sub-menu.
- Provide recaptcha sitekey.
- Provide recaptcha secretkey.
- Click on the "Save" button to store your data.

Figure 4. Atlas ReCaptcha Settings
How to get the reCaptcha site-key and secret-key:
To get the site key and secret key for your application, you can follow the simple steps below:
- Navigate to the Google Recaptcha official site, or you can click here.
- Select the "Admin Console" option.
- Provide a label for your ReCaptcha.
- Choose the "V2 checkbox" option from "ReCaptcha type."
- Add your website's URL in the Domain section.
- Accept all terms of service and click the "Submit" button.
- Copy and use the Site Key and Secret Key.
Inventory manager:
To manage the inventory, you can navigate:
- Log in to the application as an admin.
- Click on the "My shops" option from the left menu.
- Select the "Inventory manager" option from the sub-menu.
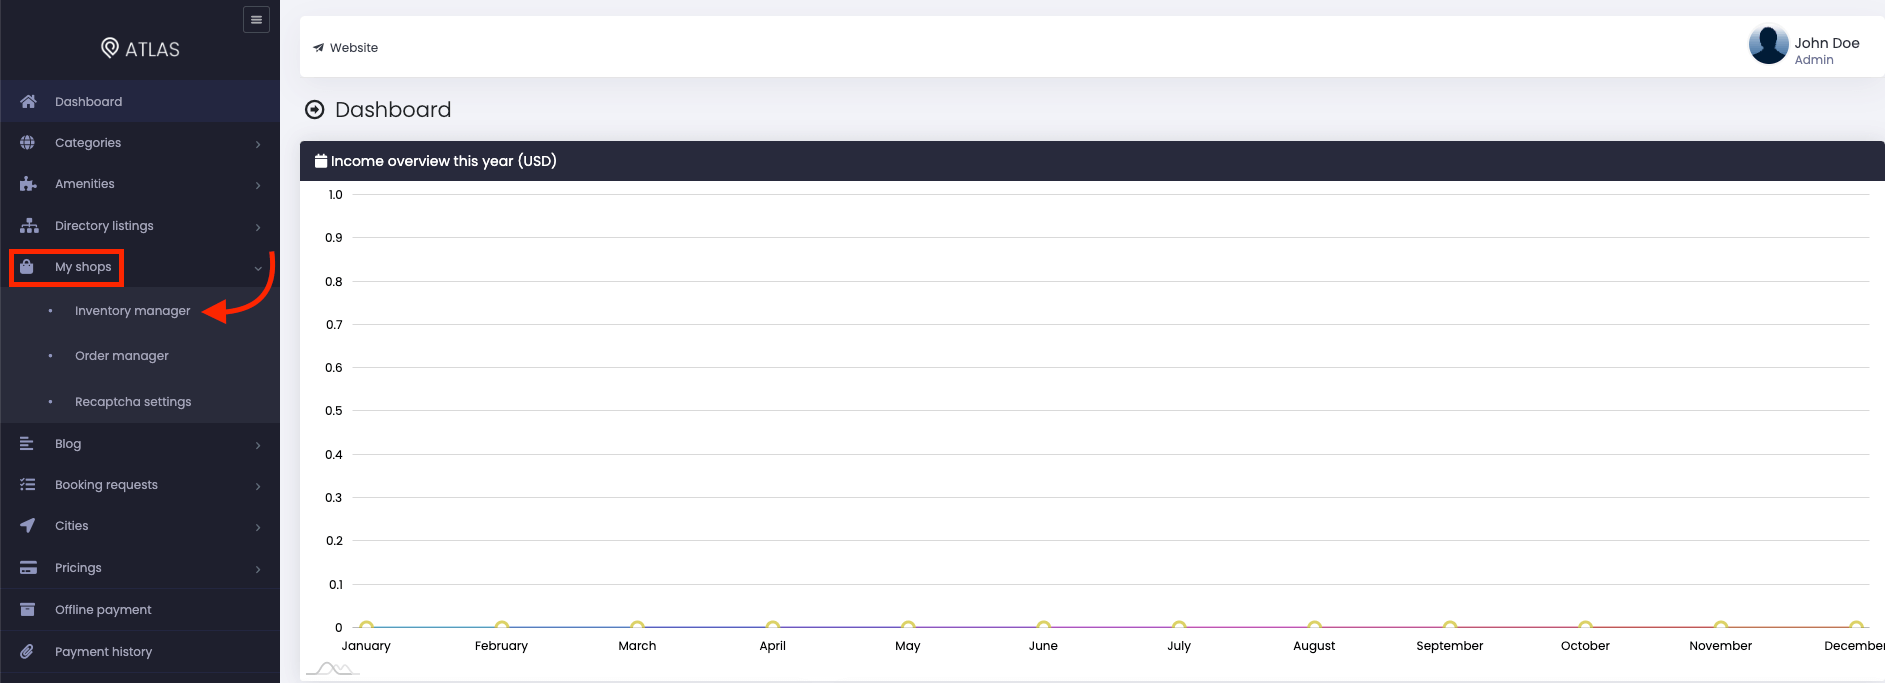
Figure 5. Atlas Inventory Settings (Admin)
Category
To add a category to the inventory, you can navigate:
- Go to the "Inventory manager" option.
- Choose a shop/directory.
- Provide a category name on the "Category title" box.
- Click on the "Add" button to save the category.
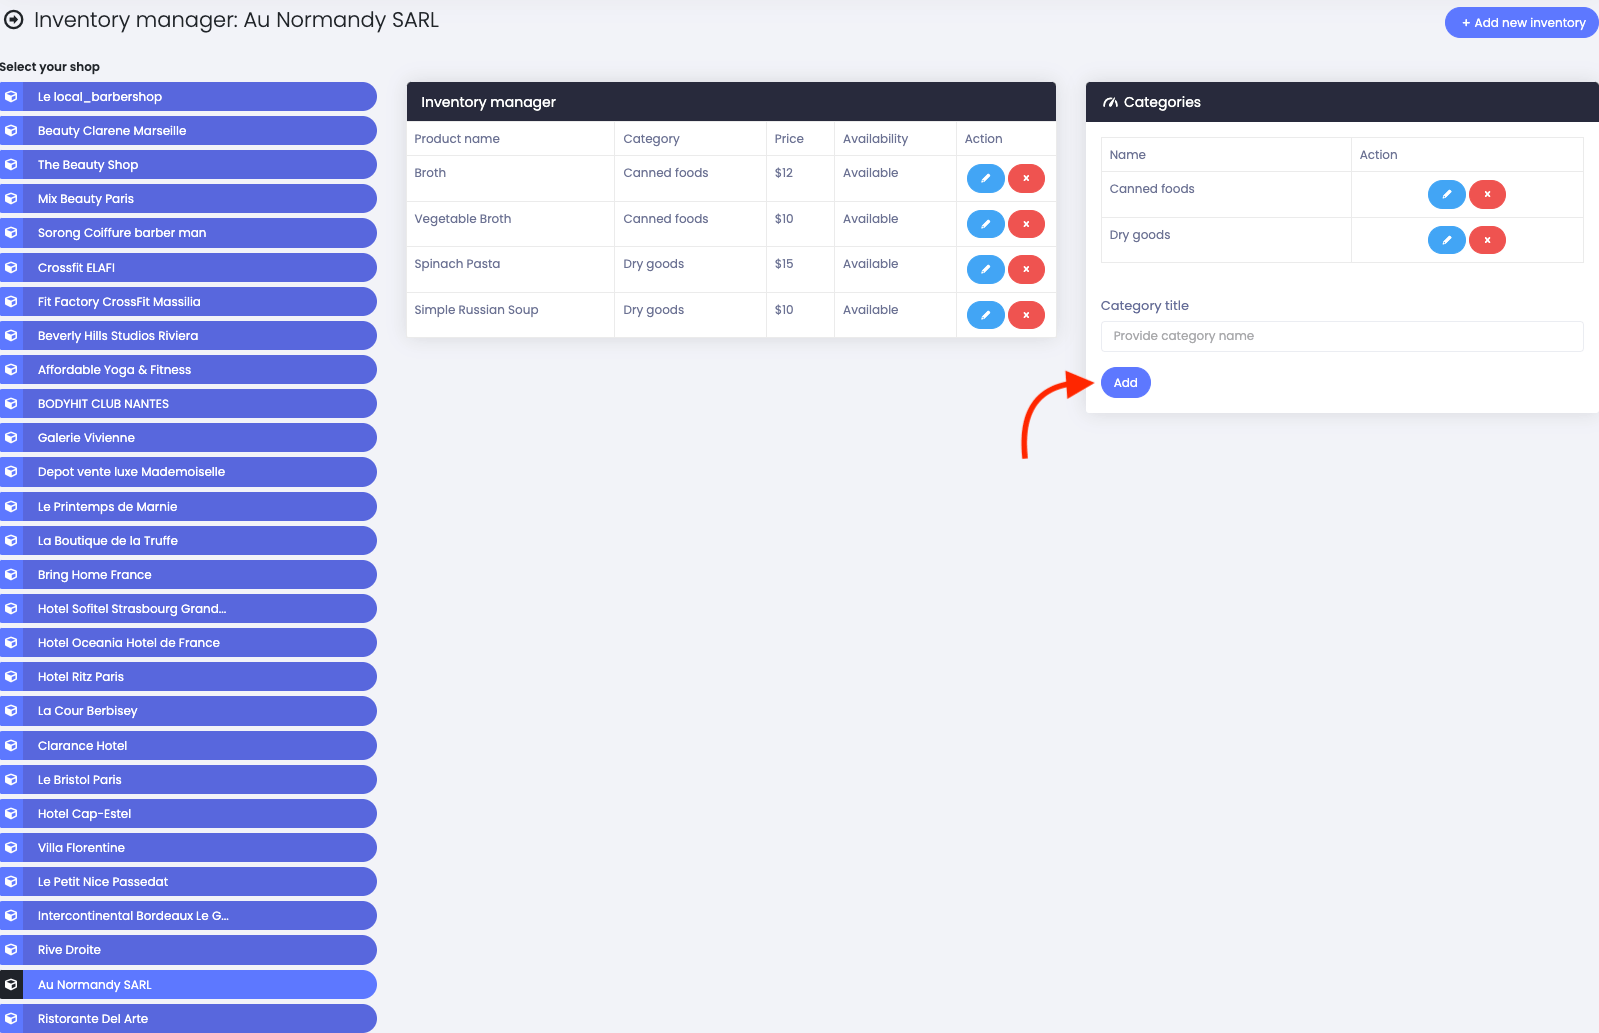
Figure 6. Atlas Adding Inventory Category (Admin)
To update a category to the inventory, you can navigate:
- Choose a shop/directory.
- Select a category.
- Click on the "Edit" icon.
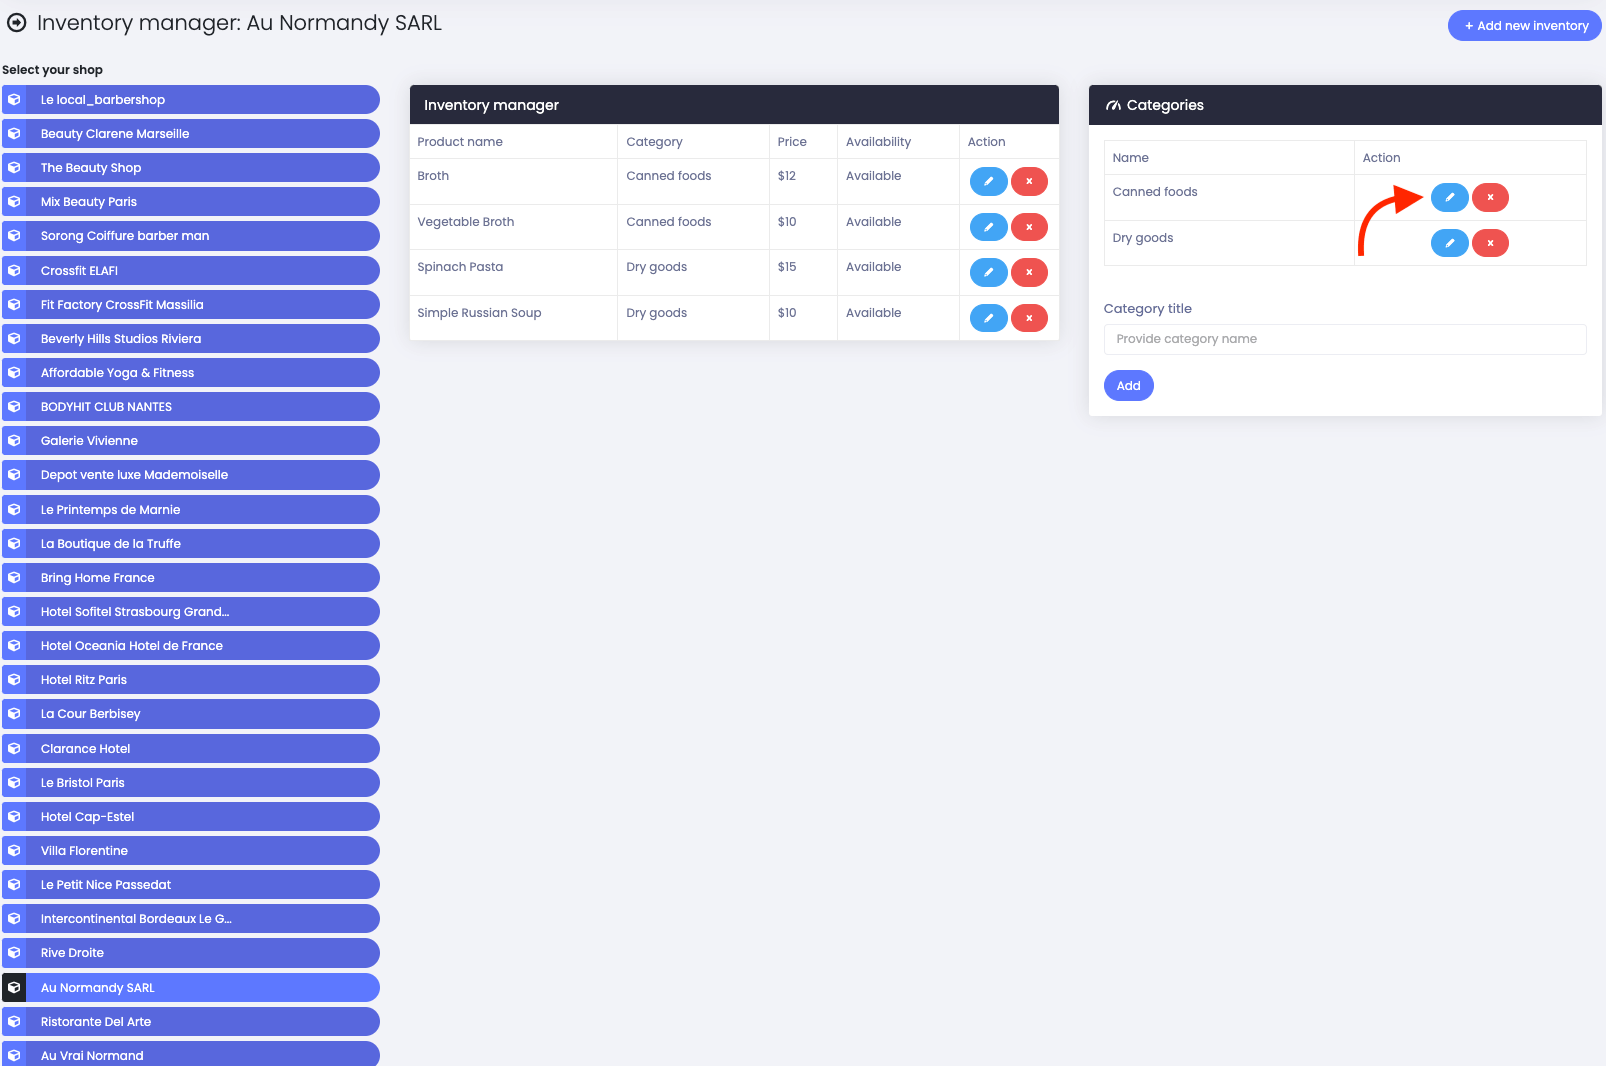
Figure 7. Atlas Editing Inventories Category (Admin)
- Update required information.
- Click on the "Submit" button.
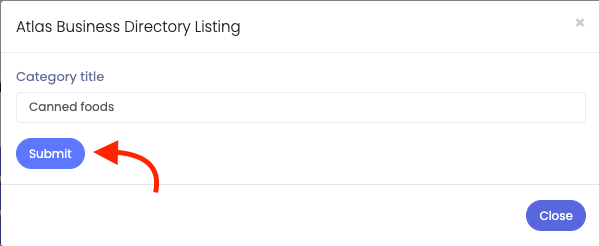
Figure 8. Atlas Submitting Edited Category (Admin)
To delete a category to the inventory, you can navigate:
- Choose a shop/directory.
- Select a category.
- Click on the "X" icon to delete a category.
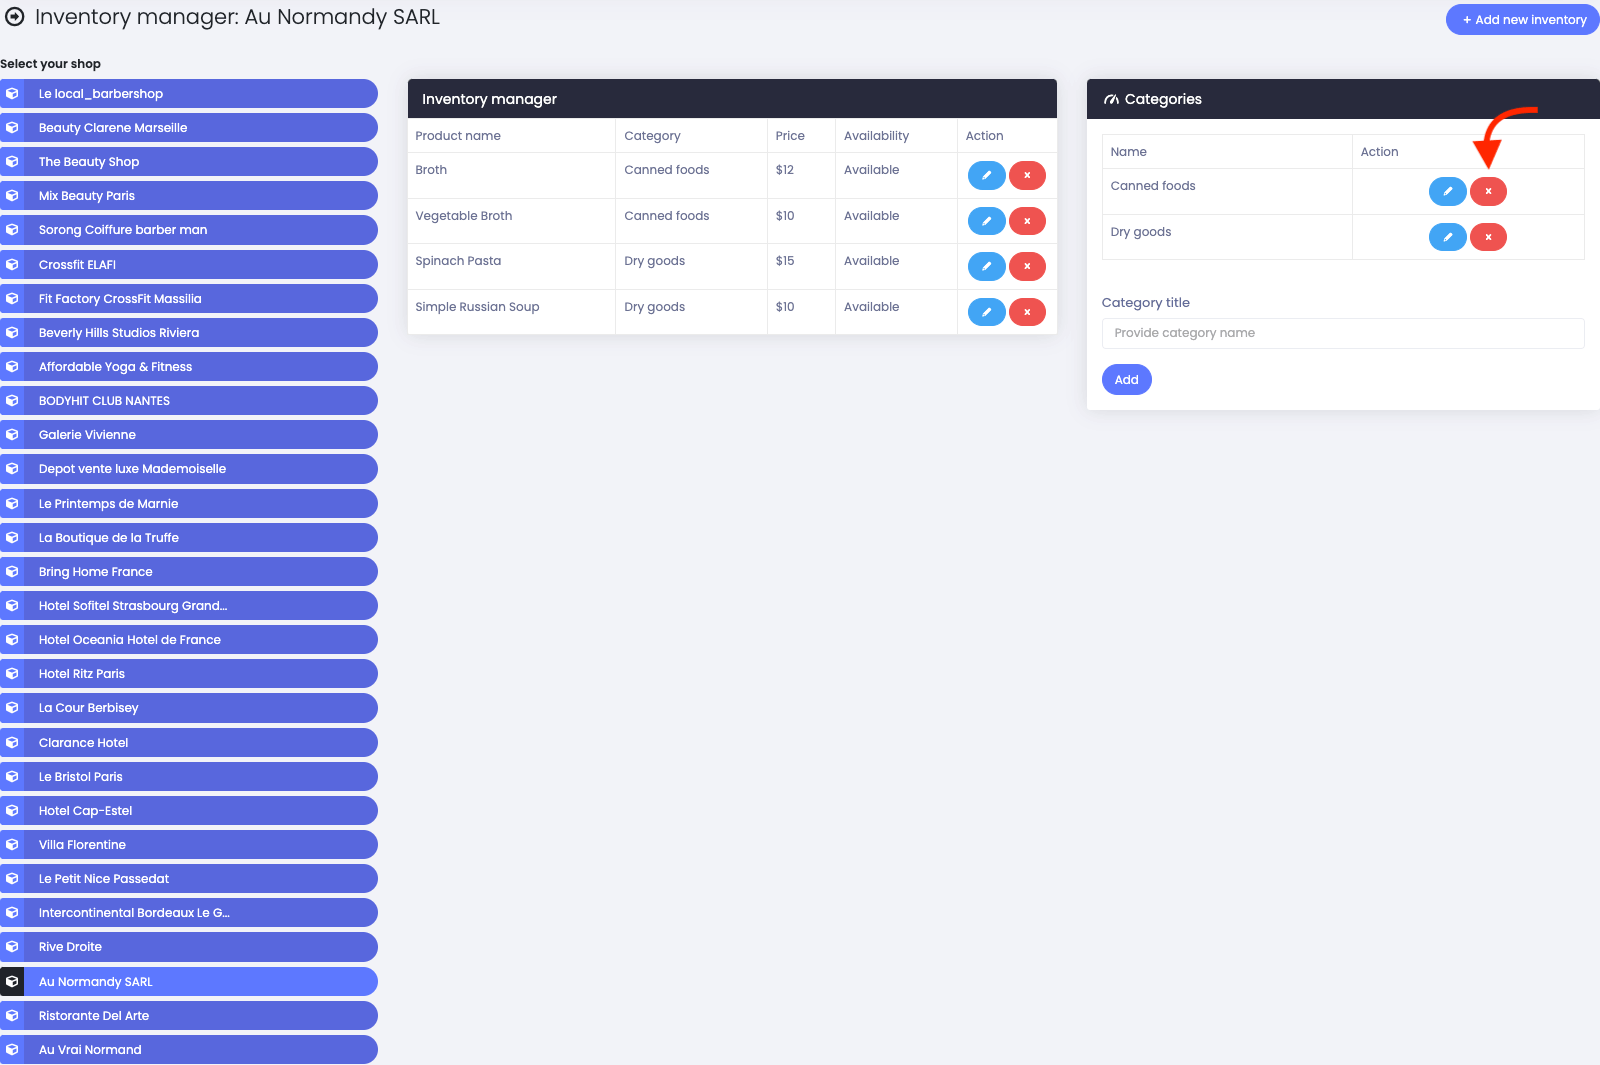
Figure 9. Atlas Deleting A Category (Admin)
Inventory
To add a new inventory, you can follow the steps below:
- Go to the "Inventory manager" option.
- Choose a shop/directory.
- Click on the "Add new inventory" button.
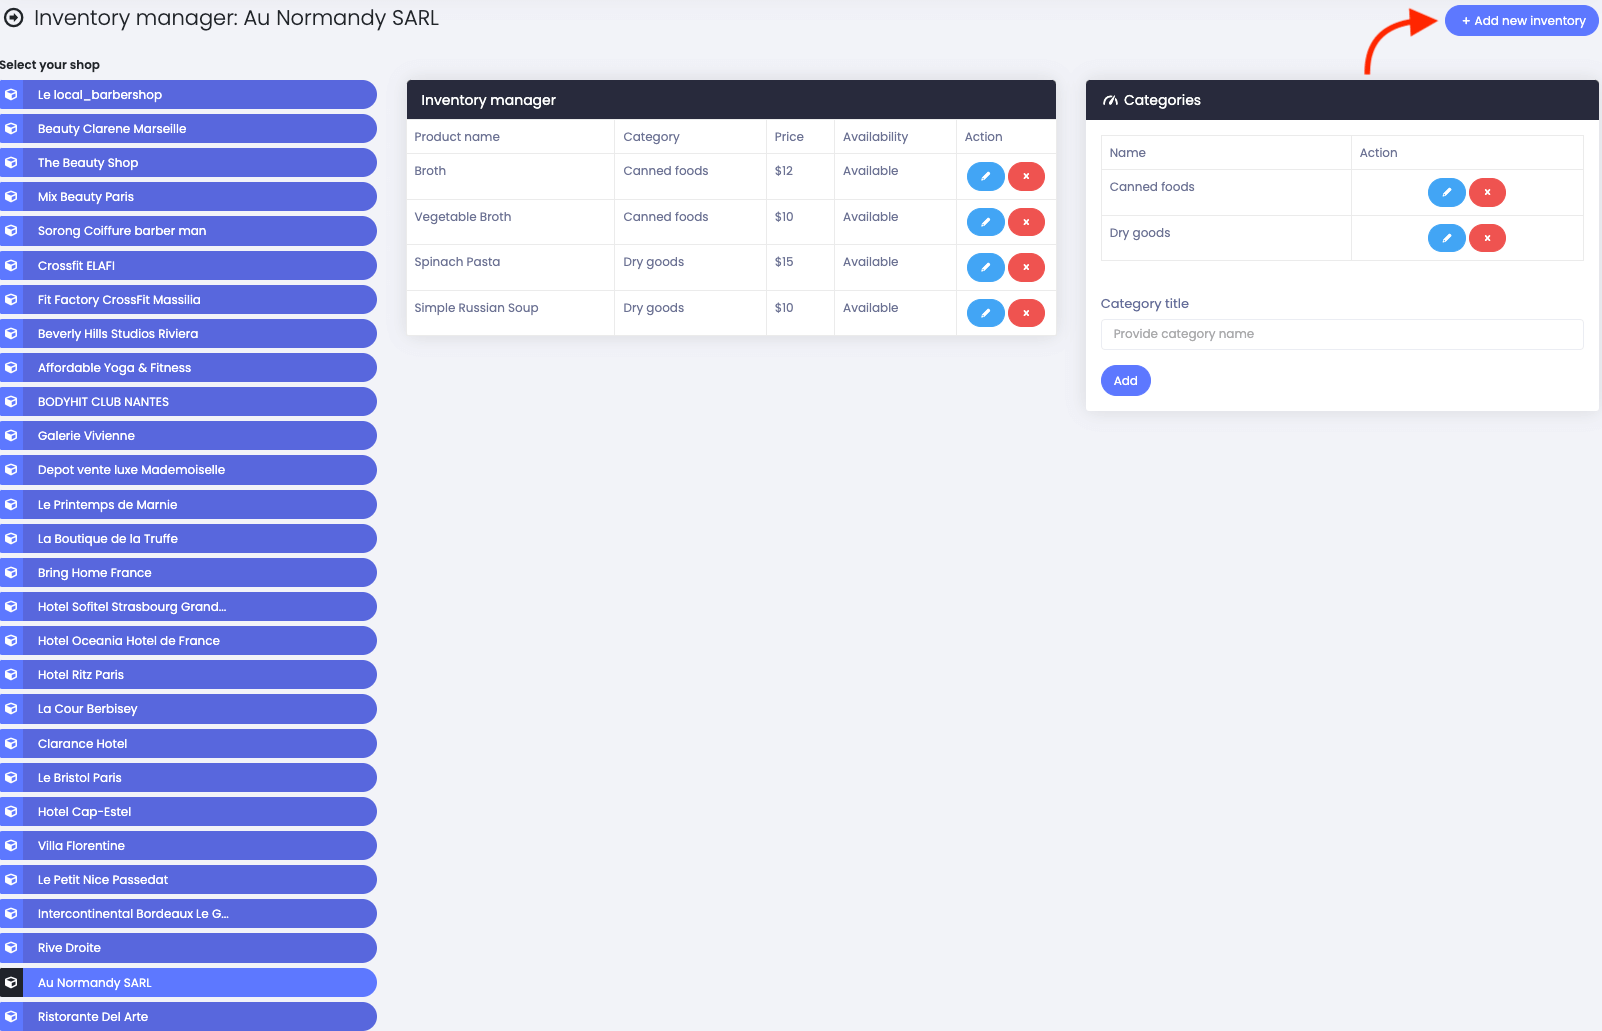
Figure 10. Atlas Adding New Inventory (Admin)
- Provide a new inventory name.
- Choose a category from the existing options.
- Add details about inventory.
- Set a price of the inventory.
- Choose an image for your product/inventory. (You can choose the images from your device)
- Choose an option from available/not available.
- Click on the "Submit" button.
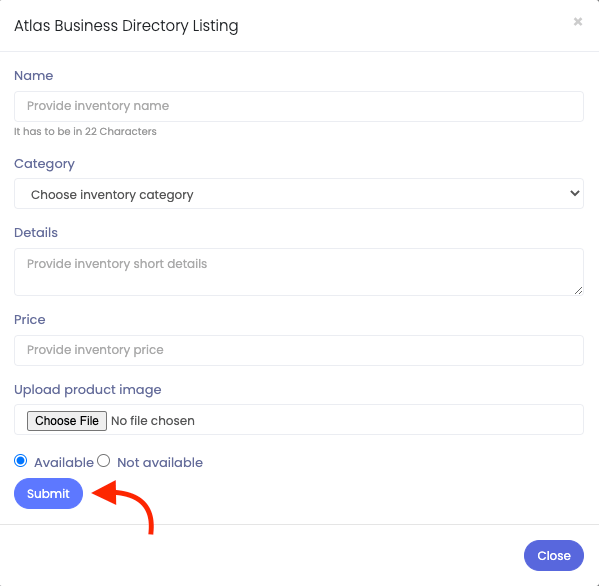
Figure 11. Atlas Submitting New Inventory (Admin)
To update an inventory, you can follow the steps below:
- Go to the "Inventory manager" option.
- Choose a shop/directory.
- Select an inventory.
- Click on the "Edit" icon.
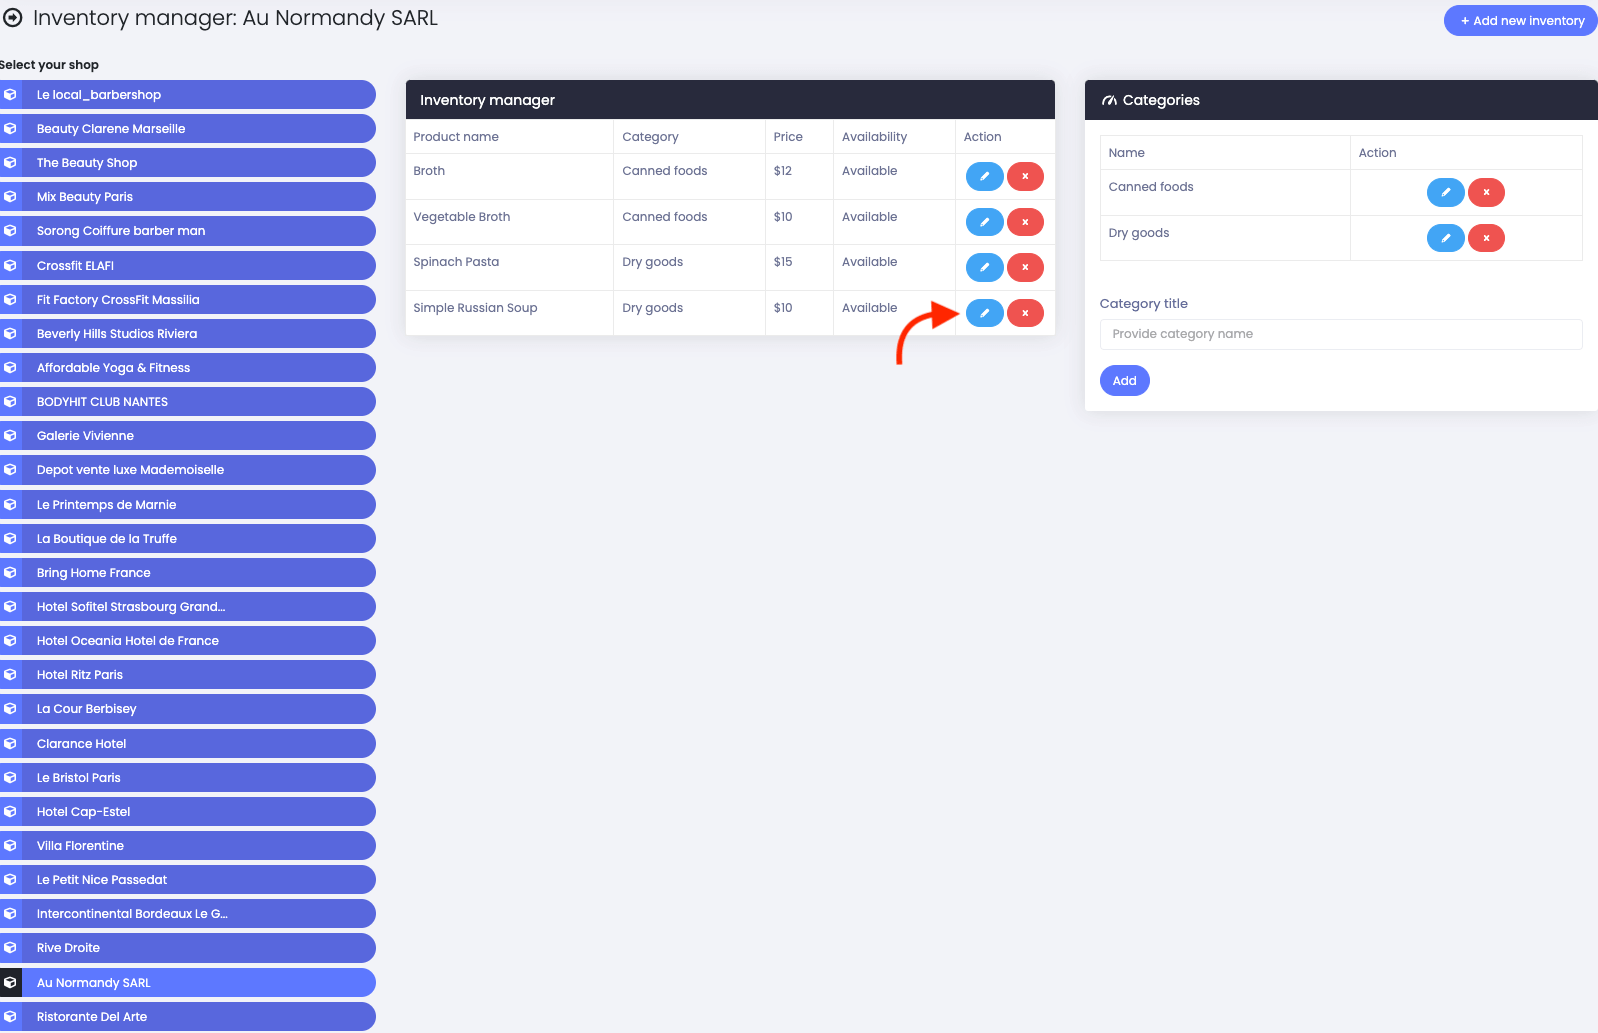
Figure 12. Atlas Editing An Inventory (Admin)
- Update required information.
- Click on the "Submit" button.
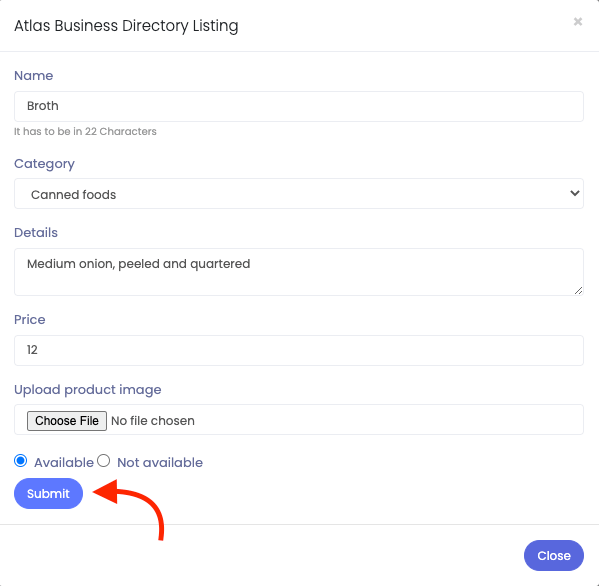
Figure 13. Atlas Submitting Edited Inventory (Admin)
To delete an inventory, you can follow the steps below:
- Choose a shop/directory.
- Select an inventory.
- Click on the "Edit" icon.
- Click on the "X" icon to delete a category.

Figure 14. Atlas Deleting An Inventory (Admin)
Order manager:
You can see the business owner's orders and manage their orders in your application. You can also filter the directories based on their names. Also, you can see the list of pending orders and delivered orders.
To navigate the order manager option, follow the steps below:
- Log in to the application as an admin.
- Click on the "My shops" option from the left menu.
- Select the "Order manager" option from the sub-menu.
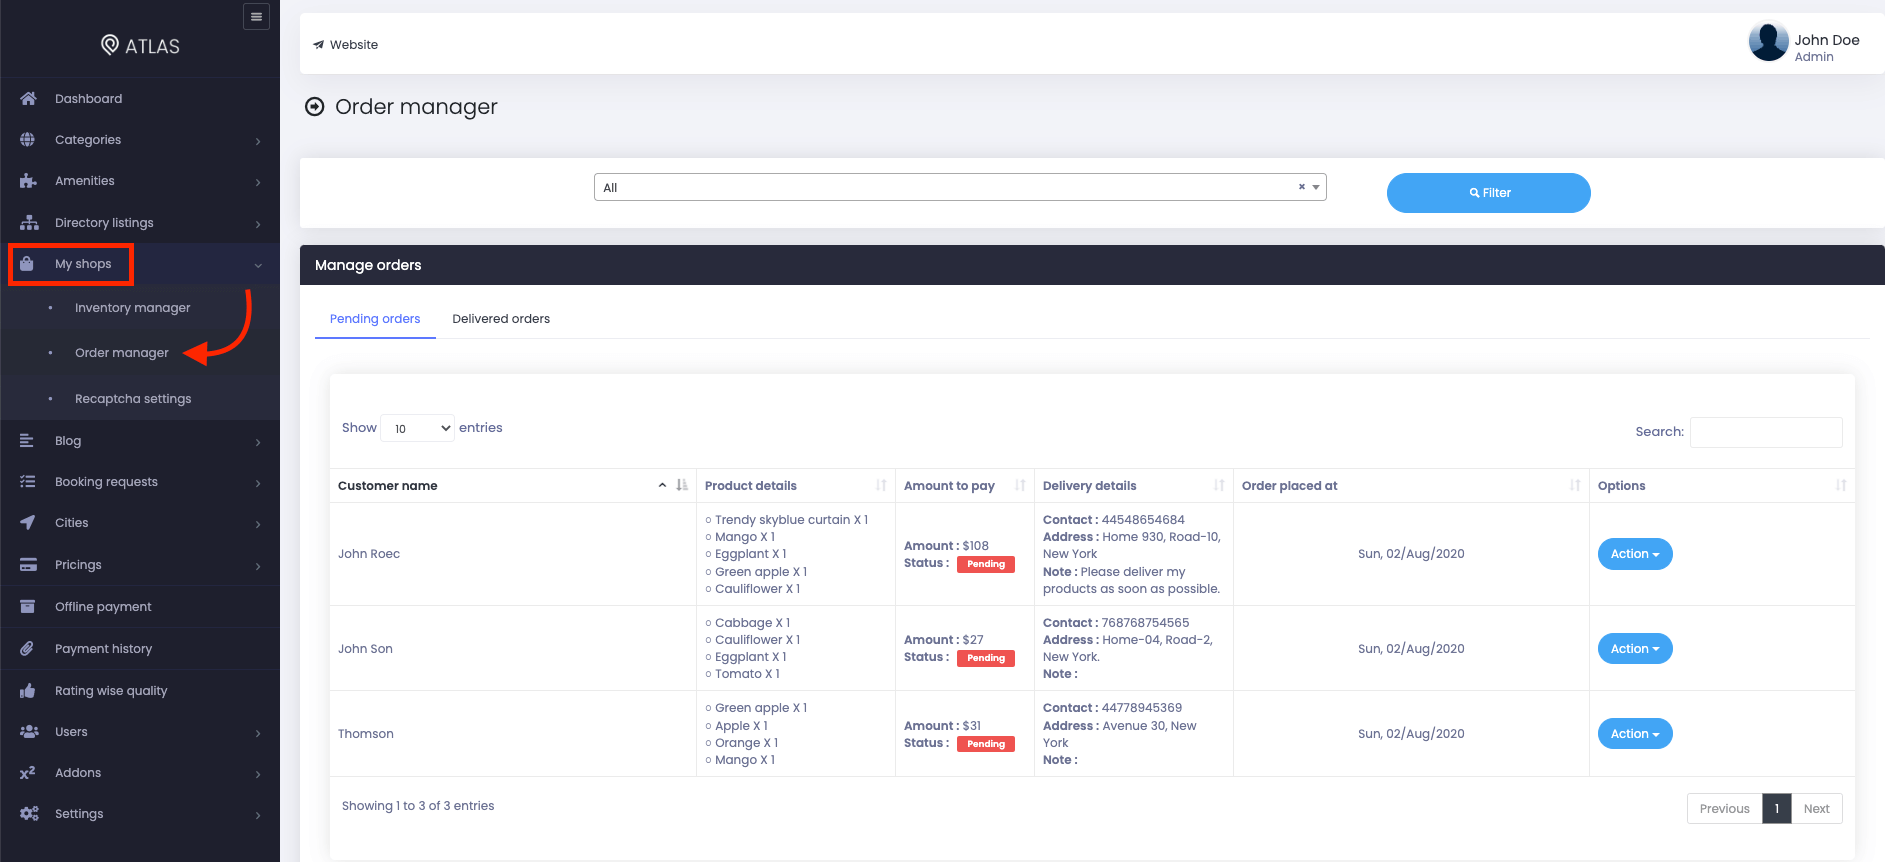
Figure 15. Atlas Order Management (Admin)
In the "Pending order" option, you can see the list of pending orders details with detailed information. Here you can:
- See the customer's name who ordered the product/service.
- See products details.
- Monitor the payable amount and current status.
- Watch delivery details. (Such as–Contact, Address, and Note)
- See order crating date.
- Get a button for more options. ("Action" button)
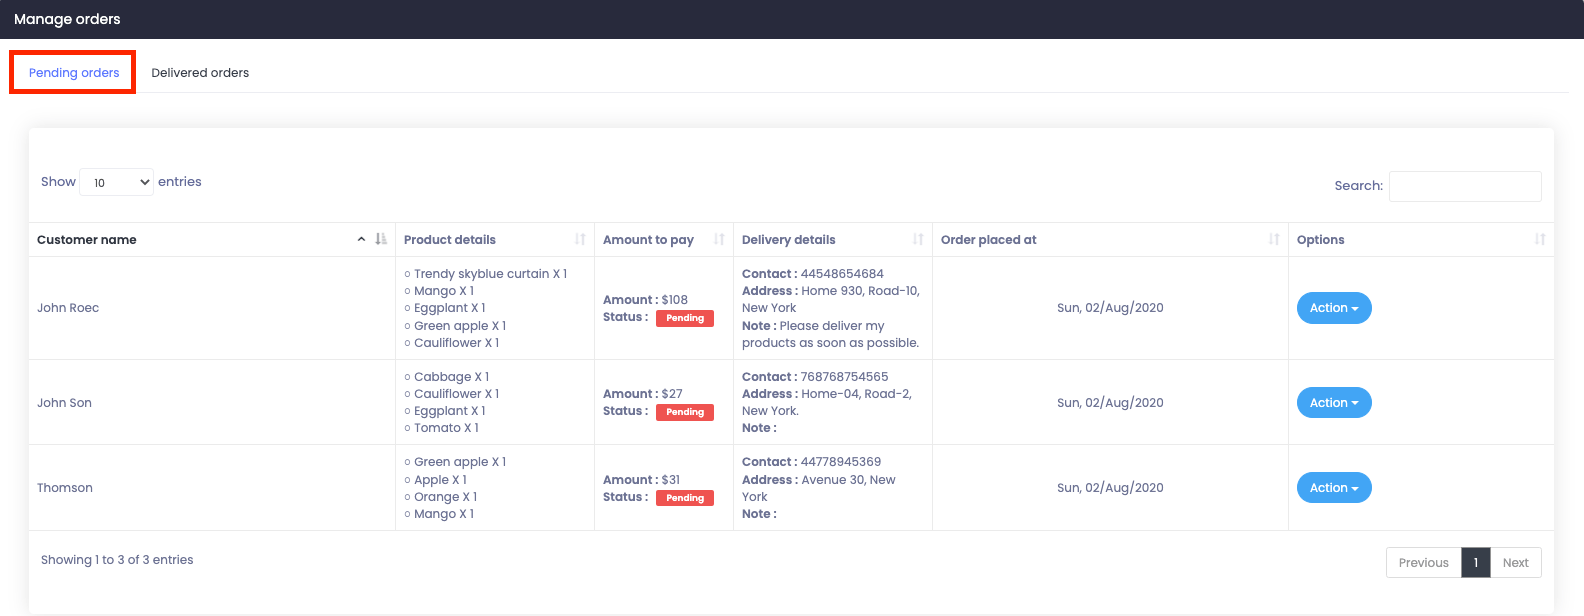
Figure 16. Atlas Pending Orders List (Admin)
You can mark any order as paid or delivered. You can also delete an order if you want. For this, you can follow the steps:
- Navigate to the "Order manager" option.
- Select the "Pending order" option.
- Choose an order.
- Click on the "Action" button.
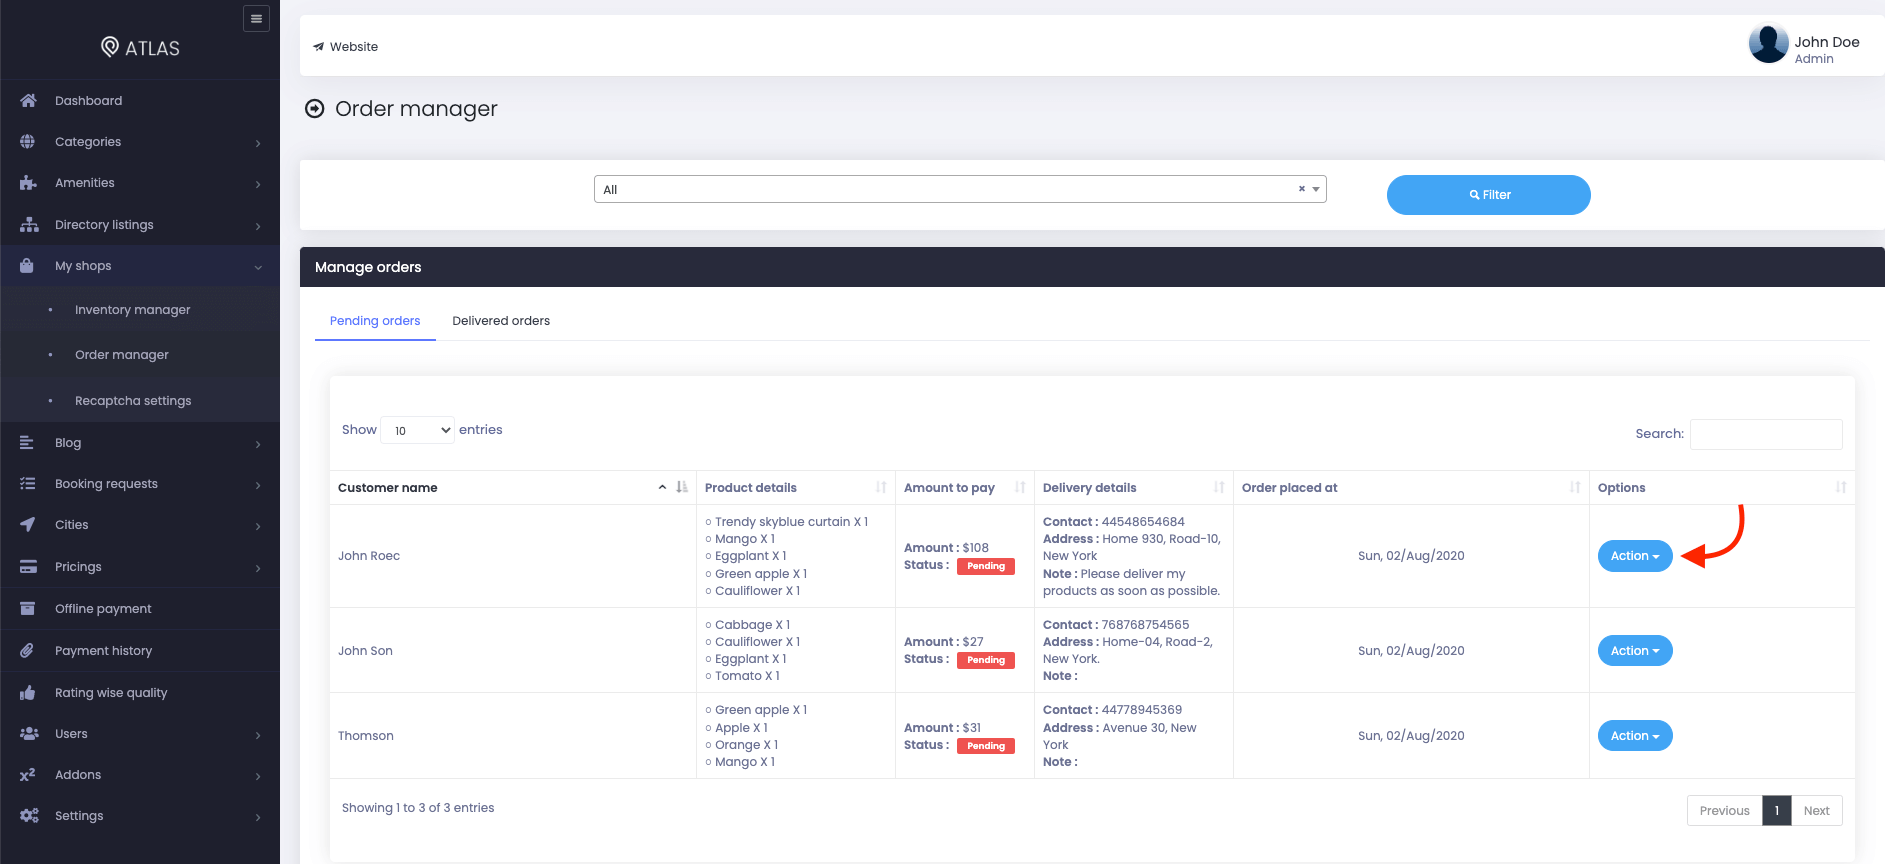
Figure 17. Atlas Managing Pending Orders - 1 (Admin)
- Select an action you want.
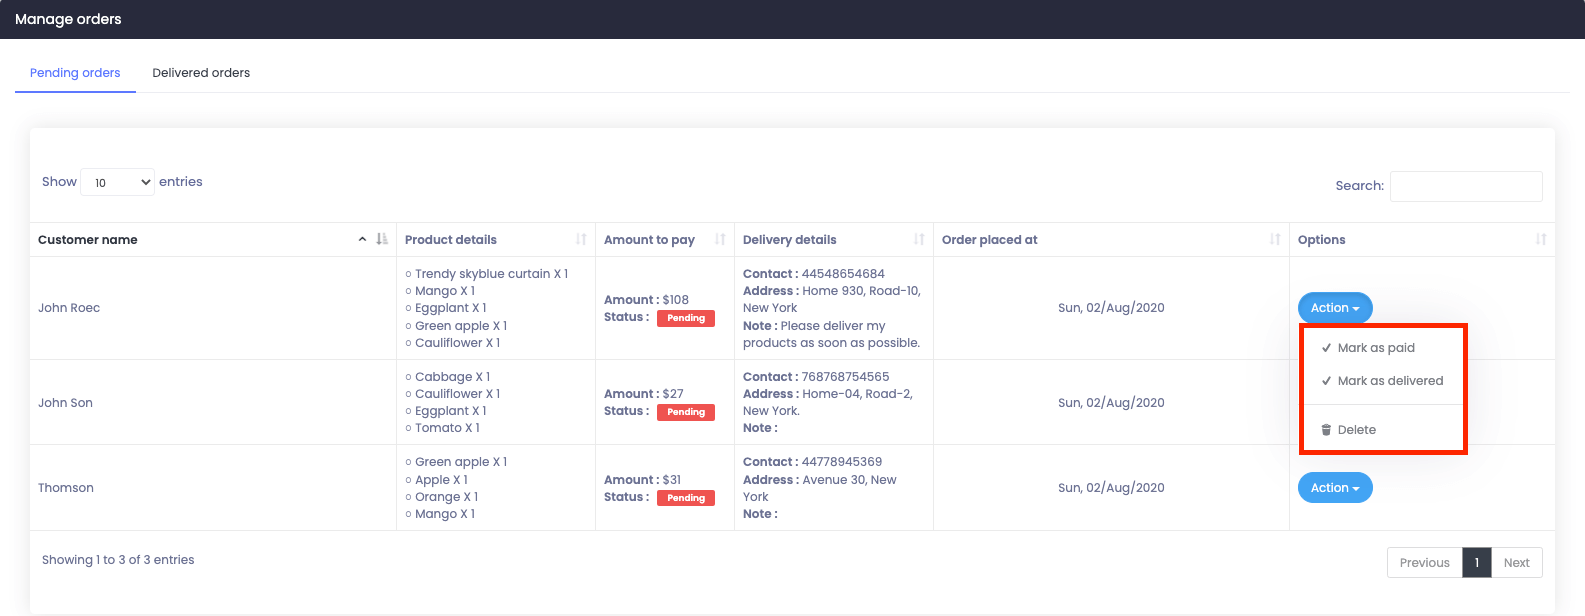
Figure 18. Atlas Managing Pending Orders - 2 (Admin)
- Click on the "Yes" button for confirmation.
You can also see the delivered orders list with detailed information in the "Delivered order" option. To navigate the "Delivered order" option, you can follow the steps below:
- Navigate to the "Order manager" option.
- Select the "Delivered order" option.

Figure 19. Atlas Delivered Orders (Admin)
Customer panel:
The business owner can add, update, or remove inventory to any directories in Atlas. They can also manage multiple categories, print out invoices, and manage their orders.
Inventory manager:
To manage the inventory, the business owners can navigate:
- Log in to the application as a customer.
- Click on the "My shops" option from the left menu.
- Select the "Inventory manager" option from the sub-menu.

Figure 20. Atlas Inventory Manager (Customer)
Category
The business owners have to create multiple categories to add a product/service. To add a category to the inventory, they can navigate:
- Go to the "Inventory manager" option.
- Choose a shop/directory.
- Provide a category name on the "Category title" box.
- Click on the "Add" button to save the category.

Figure 21. Atlas Adding Inventories Category (Customer)
To update a category to the inventory, the business owners can navigate:
- Choose a shop/directory.
- Select a category.
- Click on the "Edit" icon.

Figure 22. Atlas Editing Inventories Category (Customer)
- Update required information.
- Click on the "Submit" button.
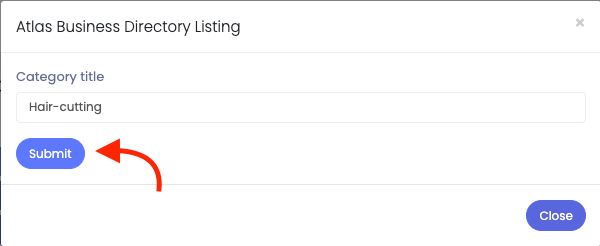
Figure 23. Atlas Submitting Edited Category (Customer)
To delete a category to the inventory, the business owners can navigate:
- Choose a shop/directory.
- Select a category.
- Click on the "X" icon to delete a category.
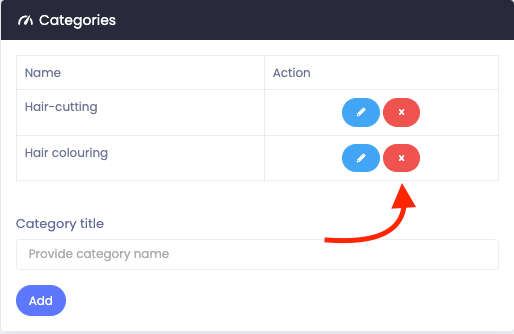
Figure 24. Atlas Deleting A Category (Customer)
Inventory
To add a new inventory, the business owners can follow the steps below:
- Go to the "Inventory manager" option.
- Choose a shop/directory.
- Click on the "Add new inventory" button.

Figure 25. Atlas Adding New Inventory (Customer)
- Provide a new inventory name.
- Choose a category from the existing options.
- Add details about inventory.
- Set a price of the inventory.
- Choose an image for your product/inventory. (You can choose the images from your device)
- Choose an option from available/not available.
- Click on the "Submit" button.
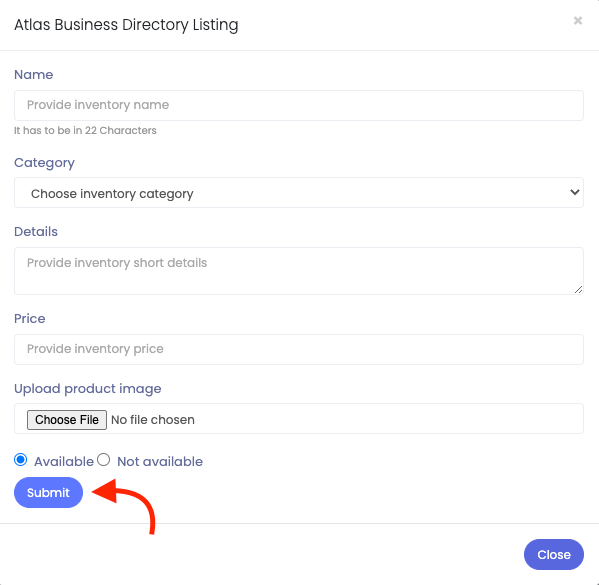
Figure 26. Atlas Submitting New Inventory (Customer)
To update an inventory, the business owners can follow the steps below:
- Go to the "Inventory manager" option.
- Choose a shop/directory.
- Select an inventory.
- Click on the "Edit" icon.

Figure 27. Atlas Editing An Inventory (Customer)
- Update required information.
- Click on the "Submit" button.
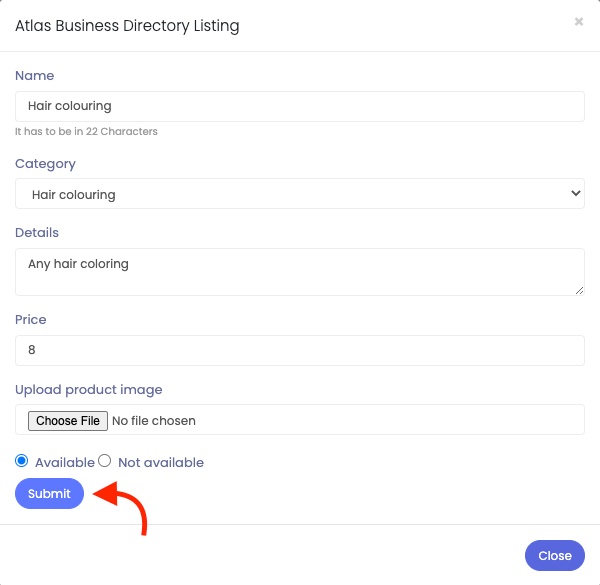
Figure 28. Atlas Submitting Edited Inventory (Customer)
To delete an inventory, the business owners can follow the steps below:
- Choose a shop/directory.
- Select an inventory.
- Click on the "Edit" icon.
- Click on the "X" icon to delete a category.

Figure 29. Atlas Deleting An Inventory (Customer)
Order manager:
The business owners can see their orders and manage them in your application. They can also filter their directories based on their business names. Also, they can see the list of their pending orders and delivered orders.
To navigate the order manager option, follow the steps below:
- Log in to the application as a customer.
- Click on the "My shops" option from the left menu.
- Select the "Order manager" option from the sub-menu.

Figure 30. Atlas Order Manager (Customer)
In the "Pending order" option, the business owners can see the list of pending orders details with detailed information. Here they can:
- See the customer's name who ordered the product/service.
- See products details.
- Monitor the payable amount and current status.
- Watch delivery details. (Such as–Contact, Address, and Note)
- See order crating date.
- Get a button for more options. ("Action" button)

Figure 31. Atlas Pending Orders (Customer)
The business owners can mark any order as paid or delivered. They can also delete an order if they want. For this, they can follow the steps:
- Navigate to the "Order manager" option.
- Select the "Pending order" option.
- Choose an order.
- Click on the "Action" button.

Figure 32. Atlas Managing Pending Orders-1 (Customer)
- Select an action you want.

Figure 33. Atlas Managing Pending Orders-2 (Customer)
- Click on the "Yes" button for confirmation.
The business owners can also see the delivered orders list with detailed information in the "Delivered order" option. To navigate the "Delivered order" option, they can follow the steps below:
- Navigate to the "Order manager" option.
- Select the "Delivered order" option.

Figure 34. Atlas Delivered Orders (Customer)
To print out an invoice for the orders, the business owner can follow the steps:
- Select the "My order" option from the left menu.
- Choose an order from the list.
- Click on the "Invoice" button.
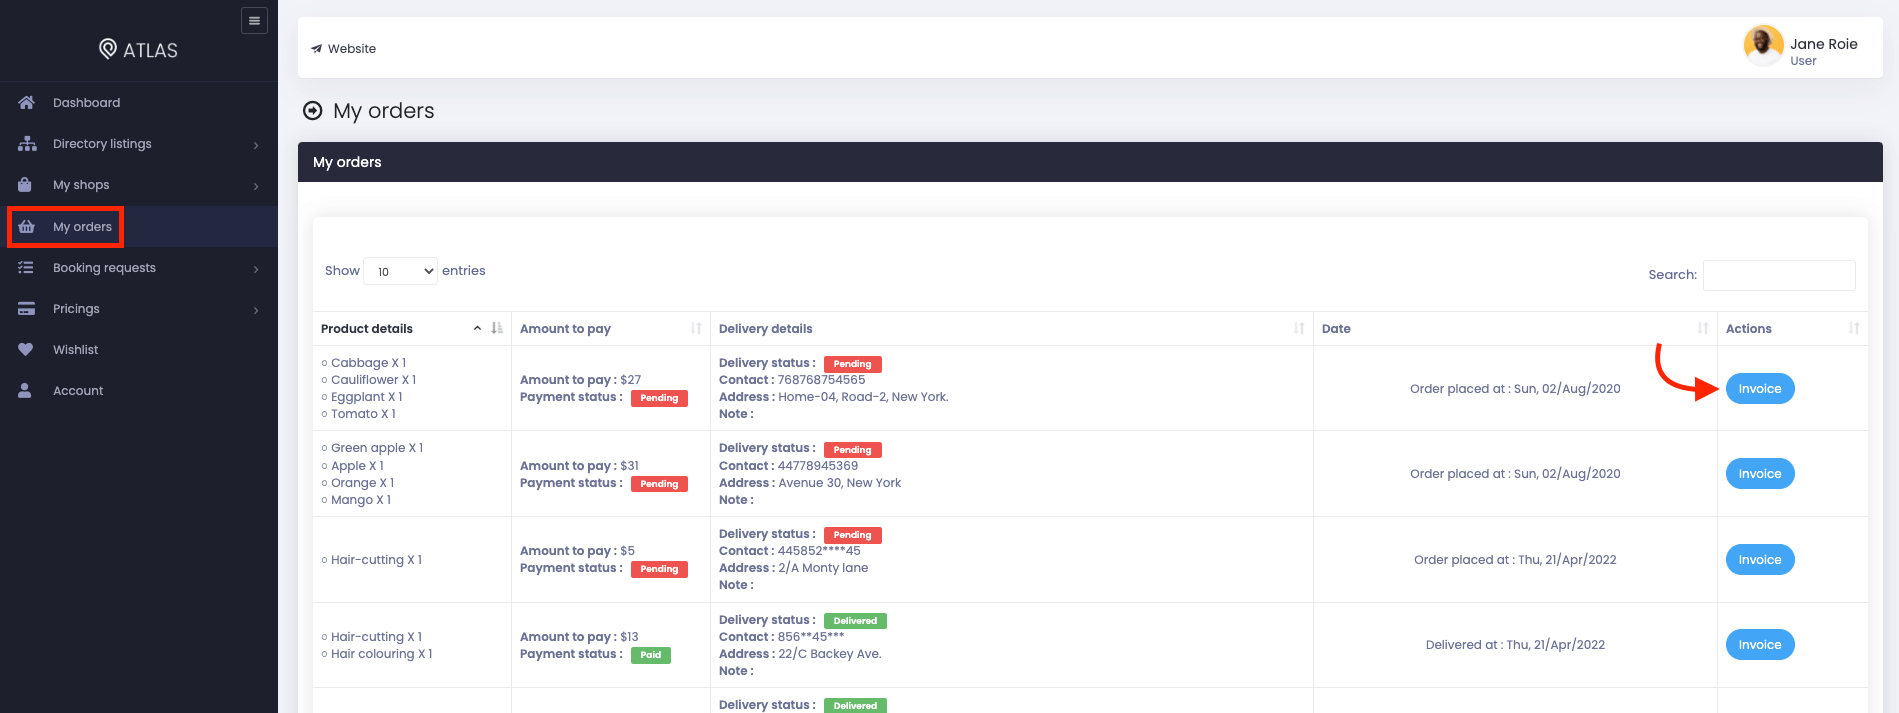
Figure 35. Atlas Generating Orders Invoice
- Select the "Print invoice" button.

Figure 36. Atlas Printing An Invoice (Customer)
Contact us and we'll get back to you as soon as possible
